


Key Takeaways
- Vacuum the leather first to remove dust and grit, preventing scratches when you begin cleaning.
- Mask off nearby electrical switches and controls so liquid cleaners can’t seep into them.
- Clean the stain using a pH-balanced leather cleaner and a soft brush, working gently in small circular motions.
- Apply a leather protectant after cleaning to restore the coating and reduce future staining.
- Ordiniq’s Handheld Wired Car Vacuum ensures the pre-cleaning extraction step is thorough, removing hidden grit from seams and creases that brushes alone miss.
How to Clean Makeup Off a Leather Car Interior
Cleaning makeup off leather requires a gentle approach because oils and pigments bond quickly to the protective coating. Start by vacuuming the leather to remove dust and grit, then mask off any nearby electrical components to keep liquid cleaners away from switches and controls.
Next, clean the stain with a pH-balanced leather cleaner applied to a soft brush, using light circular motions and wiping away residue with a clean towel. Finish by applying a leather protectant to restore the coating and prevent future staining.
In this guide, we cover these four steps in detail and explain how tools like the Ordiniq Handheld Wired Car Vacuum support the pre-cleaning stage by lifting grit from seams and creases before any liquid touches the leather.
|
Ordiniq Handheld Car Vacuum: Drive Clean, Drive Fresh Join 10,000+ Drivers Who Keep Their Cars Spotless Why Ordiniq’s Vacuum Is Essential
What Customers Say ★★★★★"I keep this lightweight vacuum cleaner in our car and it's handy to clean the mess created by our little one. The size is small but powerful enough to clean the car seat. It also has accessories that allow us to clean the small gaps and corners. Definitely will buy another one for our other car. Good value too." - Connie Try It Risk-Free for 30 Days Experience spotless car interiors with zero worries. If it doesn't transform your daily commute within 30 days, we'll refund your purchase with no questions asked. FREE BONUSES: 1-Year Extended Warranty + FREE Shipping Get Ordiniq's Handheld Wired Car Vacuum Cleaner Today! *Ordiniq also offers AutoPump and Tyre Repair Kit, which are great extras to keep in your boot for added peace of mind. |
What You Need Before You Start

Having the right tools ready before you start makes the whole process faster and safer for your leather; don’t substitute these with household items.
1. Professional Leather Cleaner
This is the foundation of the entire process. A pH-balanced professional leather cleaner is formulated to lift stains without stripping the leather’s protective coating.
For stubborn oil-based makeup, you can add a 5% alcohol solution to the cleaner to help break down the stain, but only as a secondary step if the standard cleaner isn’t cutting through.
2. Brucle Brush
A Brucle brush has soft, fine bristles that work the leather cleaner into the grain of the leather without scratching the surface. It’s especially useful for getting into textured leather finishes where makeup can settle into the grain lines.
3. Tampico Leather Cleaning Brush
The Tampico brush is made from natural plant fibre, making it gentle enough for leather but effective at agitating the cleaner to lift the stain. Use this in light circular motions; pressing too hard defeats the purpose of using a soft brush in the first place.
When using either brush, the technique matters as much as the tool:
- Work in small sections rather than covering the whole seat at once
- Use light, circular strokes; never scrub back and forth aggressively
- Apply cleaner to the brush, not directly onto the stain, to control the amount used
- Wipe away lifted residue with a clean towel after each pass
4. Bamboo Fibre Towels
Bamboo fibre towels are the preferred choice for wiping down leather because they’re soft, highly absorbent, and won’t leave lint or scratch the surface.
Standard microfibre cloths can work in a pinch, but bamboo fibre is gentler on delicate leather coatings and picks up more of the broken-down makeup residue in fewer passes.
Cleaning Makeup Off Leather Car Interior: Step-by-Step Guide
Step 1: Vacuum the Leather First

Dust, sand, and debris on leather act like sandpaper the moment you start cleaning; thorough extraction before any liquid contact prevents permanent micro-scratches.
Before any liquid or cleaner touches the leather, vacuum the entire area thoroughly. This isn’t optional. Dust, sand, and debris sitting on the leather surface will act like sandpaper the moment you start rubbing with a cloth or brush. Even particles invisible to the naked eye can cause micro-scratches that dull the finish permanently.
Pro Tip: Use a soft brush attachment on your vacuum; never a hard plastic nozzle directly on the leather surface. Run it over the seat seams and crevices where grit tends to collect before moving to the main surface area. Pay extra attention to the area around the makeup stain, where particles may have settled into the softened oils.
Once vacuumed, take a moment to assess the stain. Is it dry or still slightly tacky? A fresh stain that hasn’t fully set will respond faster to the cleaner. A dried, older stain, like foundation that’s been baked in by the sun, will need more passes and possibly that 5% alcohol addition to the cleaning solution.
Step 2: Mask Off Electrical Components
Before any liquid touches the leather, take two minutes to mask off any electrical components in the area you’re cleaning. Window switches, seat adjustment buttons, and door panel controls sit right next to or directly on leather surfaces in most modern vehicles.
A small amount of cleaning solution finding its way into a switch can cause an electrical fault that costs far more to fix than any makeup stain.
Use painter’s tape or masking tape to cover switches, buttons, and any exposed wiring or connectors near the cleaning area. Don’t use standard sticky tape because it can leave residue on trim panels or pull up soft-touch coatings when removed. Painter’s tape gives you a clean, residue-free barrier that peels off easily when the job is done.
This step is especially important if you’re cleaning the driver’s door panel or centre console area, where electrical components are densely packed. A few seconds of preparation here prevent an expensive mistake.
Here are the areas to mask before cleaning:
|
Component |
Why It Needs Protection |
|
Window switches |
Liquid ingress causes switch failure and shorts |
|
Seat adjustment controls |
Motor controls are sensitive to moisture |
|
Door lock buttons |
A cleaning solution can corrode internal contacts |
|
USB/charging ports |
Direct moisture exposure causes connector damage |
|
Climate control knobs |
Liquid can seep behind panels into electronics |
Step 3: Clean the Makeup Stain

Let the cleaner do the heavy lifting rather than your arm strength: gentle circular motions with a Tampico brush lift makeup without damaging the leather’s protective finish.
Now you’re ready to actually tackle the stain. Spray your professional leather cleaner onto the Tampico brush, not directly onto the leather, and begin working the stain in small, gentle circular motions. Keep your strokes light and controlled.
The goal is to let the cleaner do the heavy lifting, not your arm strength. Wipe away the lifted residue with a bamboo fibre towel after every two to three passes, using a clean section of the towel each time so you’re not redepositing the makeup back onto the leather.
What to Do When the Stain Won’t Budge
If the standard leather cleaner isn’t breaking down the stain after three or four passes, add a 5% alcohol solution to your leather cleaning mixture. This is particularly effective on oil-based products like long-wear foundation, full-coverage concealer, and matte lipsticks that have a high wax content.
Spray the diluted solution onto the brush and repeat the same circular technique. The alcohol works to dissolve the oil bond between the makeup and the leather coating without being harsh enough to strip the finish when used at this concentration. Never go above 5% alcohol, and never apply isopropyl alcohol undiluted directly to leather.
Why You Should Never Use APC on Leather
All-Purpose Cleaner, commonly called APC, is a staple in car detailing, but it has no place on leather. APC is alkaline, and leather requires a pH-neutral or slightly acidic cleaner to stay healthy.
Using APC on leather strips the surface coating, pulls the natural oils out of the leather, and leaves it dry, brittle, and prone to cracking. You might get the makeup stain out, but you’ll trade it for a patch of damaged leather that’s far more noticeable.
The same warning applies to household cleaners like dish soap, multi-surface sprays, and even some so-called “leather wipes” sold at petrol stations. These products are not formulated for automotive leather and often contain surfactants or solvents that degrade the finish over time. If the label doesn’t specifically say it’s safe for finished automotive leather, don’t use it.
Step 4: Apply Leather Protection After Cleaning
Leather protection, whether applied as a cream or spray, helps restore the surface coating after cleaning and prevents the material from drying out. It adds a protective barrier that keeps the leather looking even and reduces the chance of future staining.
For cars regularly exposed to makeup transfer, applying a suitable leather protectant on a routine basis helps maintain the finish and overall condition.
How to Apply Protection Without Leaving Streaks
Streaks happen when too much product is applied at once or when it’s worked into warm leather that absorbs unevenly.
Start with a small amount; for a spray, two to three short bursts across the seat is enough. For a cream, a 10p-coin-sized amount covers a full seat cushion when spread correctly. Apply it using a clean, dry bamboo fibre towel or a dedicated leather applicator pad, working in straight overlapping strokes rather than circles.
Circular application traps product in one area and causes buildup lines. Once applied, let it sit for two to three minutes, then buff off any excess with a second clean towel using light, straight strokes in the same direction as the leather grain.
Make sure the leather is at room temperature before applying protection. Leather that’s been sitting in direct sun will be warm and porous, causing the product to absorb too fast and unevenly.
If the car has been parked outside, let it cool down in the shade for 10 to 15 minutes before applying the protectant. This one step alone eliminates most streaking problems people run into.
The Pre-Cleaning Step That Protects Your Leather Investment

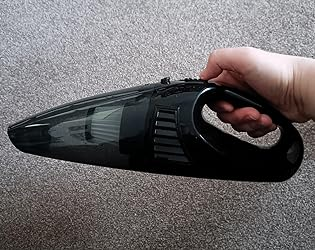
Ordiniq’s Handheld Wired Car Vacuum reaches the grit hiding in seams, stitching channels, and bolster crevices that basic brush attachments miss.
Vacuuming is the essential first step in leather care because any grit left in seams, stitching lines, or creases will scratch the surface as soon as you begin cleaning. This is where our Handheld Wired Car Vacuum makes a difference, as its crevice attachment reaches the narrow areas where abrasive particles tend to hide.
The 39,000 R/min motor provides strong, consistent suction that removes grit from tight joins rather than skimming over them. Its wired design means there is no drop in power, allowing you to work methodically across every seam and bolster without rushing or leaving debris behind.
At £49.99, it offers an effective way to protect leather interiors that are costly to repair or replace. The real choice isn’t between using a vacuum or skipping it; it’s between thorough extraction and leaving grit in place, and that difference shows clearly in the final result after makeup cleaning.
You can also complement your car care routine with our best-selling AutoPump for tyre maintenance and the Tyre Repair Kit for roadside readiness.
| Purchase Your Handheld Wired Car Vacuum today! |
Frequently Asked Questions (FAQs)
Can I use micellar water to remove makeup from leather car seats?
It can work in an emergency, but it isn’t pH-balanced for leather and may weaken the protective coating over time. A proper leather cleaner is safer.
Is it safe to use baby wipes on a leather car interior?
No. Baby wipes contain ingredients that slowly strip leather coatings, leaving the surface dull, dry, and prone to cracking.
How do I remove dried foundation from leather seats?
Use a professional leather cleaner with a soft brush and work in small circles. If it doesn’t lift after several passes, add up to 5% alcohol to the cleaner to break down the oils.
Can I use a steam cleaner to remove makeup from leather?
No. Steam cleaning damages automotive leather by penetrating and weakening the surface coating.
How does Ordiniq’s Handheld Wired Car Vacuum protect leather during makeup cleanup?
Ordiniq’s Handheld Wired Car Vacuum removes grit from seams and creases before cleaning begins, using strong wired suction and a crevice attachment to prevent abrasive particles from scratching the leather.
*Note: Pricing and/or product availability mentioned in this post are subject to change. Please check our website for current pricing and stock information before making a purchase.


