


Key Takeaways
- The most effective approach to cleaning sand from a car carpet combines three steps: loosening particles with a brush, removing them with a powerful vacuum, and reaching hidden deposits with compressed air.
- Vacuuming directly often misses embedded sand particles—always brush carpet first, bringing hidden sand to the surface where extraction becomes possible.
- Using compressed air reaches sand in crevices and tight spaces that vacuum nozzles physically cannot access.
- Regular maintenance prevents sand from causing permanent damage to your car's carpet fibres through abrasive grinding action.
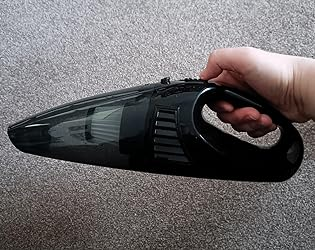
- Ordiniq's Handheld Car Vacuum delivers sustained extraction power for removing sand from car carpets.
Sand in Your Car Carpet—Why It's Particularly Problematic
Sand represents the uninvited souvenir that always accompanies you home after beach trips. Those tiny grains find their way deep into your car's carpet fibres, hiding between seats, under mats, and in every imaginable crevice.
What makes sand particularly problematic isn't merely its presence; it's what it does over time. Sand particles possess sharp, abrasive edges that act like miniature sandpaper against your carpet fibres.
Every time someone steps or shifts their feet, these particles grind against the material, gradually wearing it down. Left untreated, sand can permanently damage your car's interior, leading to frayed carpets and a prematurely aged appearance.
Beyond physical damage, sand creates that perpetual gritty sensation underfoot, making your otherwise clean car feel dirty. It's especially frustrating when you've already vacuumed multiple times but still feel those persistent granules.
|
Ordiniq Handheld Car Vacuum: Drive Clean, Drive Fresh Join 10,000+ Drivers Who Keep Their Cars Spotless Why Ordiniq’s Vacuum Is Essential
What Customers Say ★★★★★"I keep this light weight vacuum cleaner in our car and handy to clean the mess created by little one. The size is small but powerful enough to clean the car seat. It also has accessories to allow to clean the small gap and corner. Definitely will buy another piece for another car. Good value too." - Connie Try It Risk-Free for 30 Days Experience spotless car interiors with zero worries. If it doesn't transform your daily commute within 30 days, we'll refund your purchase—no questions asked. FREE BONUSES: 1-Year Extended Warranty + FREE Shipping Get Ordiniq's Handheld Wired Car Vacuum Cleaner Today! *Ordiniq also offers AutoPump and a Tyre Repair Kit —great extras to keep in your boot for added peace of mind. |
Method 1: The Dry Vacuum Technique

Brushing before vacuuming enhances sand removal—agitation brings hidden particles to the surface, where extraction becomes possible.
The dry vacuum method serves as your first line of defence against sandy carpets and works best for recent sand intrusions before particles have been ground deep into fibres.
This approach is quick, doesn't require drying time, and can prove remarkably effective with proper tools and technique.
Tools You'll Need
For successful sand removal using the dry method, you'll need a vacuum with strong suction. Car-specific vacuums or shop vacs typically perform better than household models because they deliver more powerful suction.
Ensure your vacuum includes crevice attachments for reaching between seats and other tight spaces where sand accumulates.
You'll also need a stiff-bristled brush—an upholstery brush, detailing brush, or even a clean kitchen scrub brush works well. This brush represents the secret weapon many people skip, but it's crucial for loosening embedded sand particles.
Additionally, gather microfibre cloths for surface wiping and protective gloves if you have sensitive skin.
Step-by-Step Cleaning Process
Start by removing all floor mats from your vehicle. Take them outside and shake vigorously to remove loose sand. For rubber mats, rinse with water and set aside to dry; for fabric mats, vacuum them separately after treating the main carpet.
Before vacuuming, thoroughly brush the carpet with your stiff brush, using firm but not harsh strokes. Work in one direction, then perpendicular to it, creating a grid pattern.
This brushing action breaks the hold between sand particles and carpet fibres, bringing hidden sand to the surface. Pay special attention to high-traffic areas, such as the driver and passenger footwells.
Now vacuum the entire carpet area systematically, using overlapping strokes for thorough coverage. Start on one side of the vehicle and work your way across, making sure you don't miss any spots. For extra-stubborn areas, press the vacuum nozzle firmly against the carpet and move it in small, concentrated motions to maximise suction power.
When to Use This Method
The dry vacuum technique is ideal for routine maintenance and for relatively fresh sand contamination. It's your go-to method when you notice sand in your car within a few days of a beach trip or outdoor adventure.
This approach also suits situations when you're short on time or don't want the longer drying times associated with wet cleaning methods.
For cars with light-to-moderate sand problems, this method alone may completely resolve the issue. However, if sand has been ground into carpet for weeks or months, you might need to combine this with one of the more intensive methods below.
Method 2: The Steam Cleaning Approach

Steam cleaning penetrates deep into carpet fibres where dry vacuuming cannot reach, loosening stubborn sand particles ground in over extended periods.
This method penetrates deep into carpet fibres where dry vacuuming can't reach, loosening stubborn sand particles that have been ground in over time. It's particularly effective for cars that have accumulated sand over multiple beach trips or through regular use in sandy environments.
Required Equipment
To effectively steam-clean your car's carpets, you'll need a portable carpet steam cleaner with upholstery attachments. These machines combine hot water, cleaning solution, and suction into a single device.
If you don't own one, consider renting from a home improvement store or using a carpet extractor designed for automotive use. You'll also need an appropriate carpet cleaning solution safe for vehicle interiors, microfibre towels, and access to clean water. Rubber gloves help prevent skin irritation from cleaning chemicals and hot surfaces.
Preparation Steps
Before introducing any moisture to your car, perform thorough dry cleaning following Method 1. This prevents surface sand from turning into mud that can be harder to remove.
The Steam Cleaning Process
- Start from the back of the car, working forward, avoiding stepping on cleaned areas
- Apply cleaning solution sparingly—oversaturation leads to mildew
- Work in small, manageable sections, approximately 2–3 square feet at a time
- Use slow, methodical passes with the steam cleaner
- For heavily soiled areas, make multiple passes
Begin the steam cleaning process by applying the steam cleaner to small sections of carpet. Press down firmly and move the nozzle slowly across the carpet in straight, overlapping lines.
The combination of heat, moisture, and cleaning solution helps dissolve any oils or dirt that bind sand particles to carpet fibres. This loosening action proves crucial for removing deeply embedded sand.
After steaming each section, immediately run the extraction function on your machine. Make several passes, removing as much moisture as possible.
Look for clear water in the extraction tank—if it's still coming up dirty, repeat the process on that section. Pay special attention to areas around the pedals and under the seats where sand accumulates at the highest concentrations.
Drying Your Carpets Properly
Proper drying proves just as important as cleaning itself. After steam cleaning, use microfibre towels to blot excess moisture from the carpet.
Press firmly but don't rub, as rubbing can push moisture deeper into the padding. Once you've removed as much surface moisture as possible, set up fans to increase air circulation throughout the vehicle.
Complete drying typically takes 24–48 hours, depending on climate conditions. During this time, keep the car parked in a covered area that is protected from rain but has good airflow. Avoid using your car until the carpets are completely dry to prevent mildew and musty odours.
Method 3: The Compressed Air Technique
This technique literally blasts sand particles out of hiding places, making them accessible for removal. It's particularly effective for those frustrating situations when you can still feel sand despite multiple vacuum attempts.
Tools for the Job
The primary tool for this method is a source of compressed air. This can be an air compressor with a blow gun attachment, a portable air duster like those used for electronics, or even a leaf blower on its lowest setting if necessary.
You'll also need your vacuum cleaner ready to capture dislodged sand, protective eyewear to prevent sand from getting in your eyes, and a dust mask to avoid inhaling fine particles. For best results, gather some detailing brushes to help direct airflow into tight spaces.
Setting Up Your Workspace
Here’s a prepapreation checklist you can follow:
- Choose a well-ventilated area, ideally outdoors or in a garage with open doors
- Position your car with doors fully open for maximum access
- Remove all floor mats, seat covers, and personal items
- Have your vacuum ready nearby for immediate use
- Wear eye protection and a dust mask
Park your vehicle in a location where sand blowing out won't be a problem, and avoid windy conditions that might blow sand back into your car. Before starting, thoroughly vacuum the car using Method 1 to remove as much loose sand as possible.
This preliminary step prevents a sandstorm from forming inside your vehicle when you begin using compressed air.
Blasting Away Sand Step-by-Step
Working methodically from one side of the vehicle to the other, direct short bursts of air at the carpet, moving from top areas to bottom. The key is to use controlled, targeted bursts rather than continuous airflow, giving you greater precision and preventing sand from scattering wildly.
Position the air nozzle at a 45-degree angle to the carpet surface to dislodge sand without driving particles deeper into the pile.
Follow immediately behind your air blasting with the vacuum cleaner to capture loosened sand before it has a chance to settle. This two-handed approach, with one hand operating the air source and the other managing the vacuum, creates a continuous process that maximises efficiency.
Pay special attention to seams, edges along doors, seat tracks, and under pedals where sand accumulates most heavily.
Finishing Touches
After blasting away sand with compressed air, take extra steps to ensure your car's interior stays pristine. Use a microfibre cloth to wipe down all hard surfaces where sand might have settled during cleaning.
Check areas such as the dashboard, door panels, and centre console. For any remaining sand spots in the carpet, sticky lint rollers can pick up stubborn particles that manage to escape your vacuum.
Why the Ordiniq Handheld Car Vacuum Excels at Sand Removal

Sand embeds deeper with every footstep—effective extraction requires sustained effort that battery-powered equipment simply cannot deliver.
Sand removal isn't a quick job. It demands multiple passes, methodical coverage, and the patience to work through every crevice until your carpet genuinely feels clean. That's exactly why at Ordiniq, we designed the Handheld Car Vacuum with a wired 12V connection rather than a battery.
Plug into your vehicle's power outlet and clean until the job is actually finished—not until a battery dies. It delivers consistent suction from your first pass to your fiftieth, with no gradual weakening or power-management throttling.
The crevice and upholstery attachments reach the tight spaces where sand hides most stubbornly, while HEPA filtration ensures extracted particles stay captured rather than recirculating into your interior.
We also have the AutoPump for professional-grade tyre inflation and a Tyre Repair Kit for complete vehicle care, for owners who value thoroughness.
| Purchase the Handheld Car Vacuum today! |
Frequently Asked Questions (FAQs)
How often should I clean sand out of my car's carpets?
The frequency of cleaning depends largely on your lifestyle and environment. If you live near beaches or frequently visit sandy areas, perform a quick vacuum after each trip to prevent buildup.
For most drivers, a thorough sand-removal process every 2–4 weeks is sufficient to prevent damage to carpet fibres and to maintain clean interiors.
Can I use a regular household vacuum to clean my car's carpets?
Yes, you can use a household vacuum, but it's not ideal for thorough carpet cleaning in the car, particularly for removing sand. Standard home vacuums often lack the powerful suction needed to extract embedded sand particles from dense car carpeting.
Additionally, their design makes it difficult to reach tight spaces in vehicles. If a household vacuum is your only option, use attachments with the smallest nozzle available and work methodically in small sections.
Will cleaning sand from car carpets remove stains too?
Basic sand removal methods focus primarily on extracting particles rather than removing stains. Whilst steam cleaning (Method 2) can help lift some light stains, established stains from spills, mud, or oil require specific stain treatment.
For effective stain removal, identify the type of stain first, then use an appropriate cleaner designed for that specific substance.
Is it worth paying for professional car carpet cleaning?
Professional cleaning is worthwhile in several scenarios: when dealing with deeply embedded sand that DIY methods haven't removed, when you lack the time or proper equipment for thorough cleaning, or when your car carpets require simultaneous sand removal and stain treatment.
Professional services typically use industrial-strength equipment that extracts significantly more sand and dirt than consumer-grade tools. They also have access to specialised cleaning solutions not readily available to the general public.
How powerful is the Ordiniq Handheld Car Vacuum suction?
The motor provides strong, consistent suction throughout your entire cleaning session. Unlike battery models that throttle performance to extend runtime, the Handheld Car Vacuum maintains the same extraction force from start to finish.
*Note: Pricing and/or product availability mentioned in this post are subject to change. Please check our website for current pricing and stock information before making a purchase.


