


Key Takeaways
- Your car's headliner needs regular cleaning to prevent stains and odours from becoming permanent.
- Spot cleaning with microfibre cloths and gentle solutions works for light stains and fresh marks.
- Steam cleaning provides the most thorough results for heavily soiled headliners when done correctly.
- Mould and water damage require immediate attention to prevent health hazards and permanent damage.
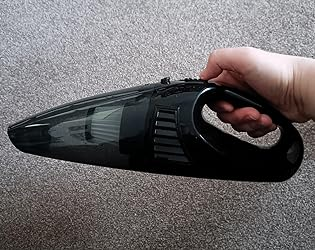
- Ordiniq's Handheld Wired Car Vacuum makes car headliner maintenance easier by removing loose dirt before it becomes embedded.
Why Your Car's Interior Roof Gets Dirty
Your car's headliner is essentially upholstery glued to a foam backing and attached to the metal roof. This design creates a comfortable interior but also makes it vulnerable to collecting contaminants. The fabric traps oils from hands and hair when passengers touch or brush against it.
Environmental factors like cigarette smoke, food odours, and pollutants from outside air gradually build up in the fibres. Steam and humidity from passengers breathing, sweating, or bringing wet items into the car can create a breeding ground for bacteria and mould.
The ceiling's horizontal position makes it particularly susceptible to collecting rising hot air that carries oils and particles, which then settle on the surface. This explains why you might notice darkening near air vents or areas where heads frequently touch the ceiling.
Common Ceiling Stains You'll Encounter
The headliner in your vehicle can accumulate several distinct types of stains, each requiring a specific approach. Oil-based stains from hair products, hand oils, or food appear as darkened spots that gradually spread over time. These stains become particularly noticeable on light-coloured headliners and often concentrate around driver and passenger areas.
Water stains create distinctive rings or discoloured patches and usually result from leaky sunroofs, window seals, or spills. If left untreated, these moisture spots can lead to mould growth, which presents as black or green speckled patterns with a musty odour.
Smoke residue creates an overall yellowing effect and embeds odours deep in the fabric fibres, making it one of the most challenging contaminants to remove completely. Children's fingerprints, pen marks, and food splatters round out the list of common ceiling blemishes you might encounter.

Different types of stains require specific cleaning approaches—water stains need antimicrobial treatment while oil stains respond better to degreasers. (Image courtesy of Reddit)
How Often You Should Clean Your Car Headliner
Maintaining your car's ceiling fabric requires a balanced approach. Clean it too infrequently, and stains become permanent. Clean it too aggressively or too often, and you risk damaging the delicate material.
For most drivers, a quick inspection and light dusting of your headliner during regular bi-weekly or monthly interior cleaning provides sufficient preventative maintenance. This simple step prevents dirt buildup that could eventually require more intensive cleaning methods.
Your driving habits and environment should dictate your specific cleaning schedule too. If you frequently travel with children, pets, or smokers, you'll likely need to spot clean your ceiling monthly to prevent stains from setting. Those living in humid climates should pay special attention to their headliners, checking for early signs of mould or mildew every few weeks.
|
Ordiniq Handheld Car Vacuum: Drive Clean, Drive Fresh Join 10,000+ Drivers Who Keep Their Cars Spotless Why Ordiniq’s Vacuum Is Essential
What Customers Say ★★★★★"I keep this light weight vacuum cleaner in our car and handy to clean the mess created by little one. The size is small but powerful enough to clean the car seat. It also has accessories to allow to clean the small gap and corner. Definitely will buy another piece for another car. Good value too." - Connie Try It Risk-Free for 30 Days Experience spotless car interiors with zero worries. If it doesn't transform your daily commute within 30 days, we'll refund your purchase—no questions asked. FREE BONUSES: 1-Year Extended Warranty + FREE Shipping Get Ordiniq's Handheld Wired Car Vacuum Cleaner Today! *Ordiniq also offers AutoPump and a Tyre Repair Kit —great extras to keep in your boot for added peace of mind. |
Method 1: Quick Spot Cleaning for Light Stains
When you notice a fresh stain or light soiling on your car's ceiling, quick action with spot cleaning can prevent the mark from becoming permanent. This gentle approach works well for isolated stains without risking damage to the surrounding fabric or the adhesive holding your headliner in place.

Spot cleaning addresses individual stains immediately before they penetrate deep into the headliner fabric. (Image courtesy of Fortador USA)
Supplies You'll Need
- Clean microfibre cloths (at least 2–3)
- Upholstery cleaner (automotive-specific works best)
- Soft-bristled brush or old toothbrush
- Spray bottle with clean water
- Gentle dish soap (as an alternative cleaner)
- White vinegar (for odour removal)
- Vacuum with brush attachment
Before beginning any cleaning process, prepare your workspace properly. Park your vehicle in a shaded area to prevent cleaning solutions from drying too quickly in direct sunlight. Open all doors to ensure proper ventilation while working with cleaning products.
Start by thoroughly vacuuming the entire headliner using a brush attachment on low suction to remove loose dirt and debris. This preliminary step prevents you from grinding existing dirt deeper into the fibres during cleaning.
Step-by-Step Spot Cleaning Process
Begin your spot cleaning by testing any cleaner on a small, inconspicuous area of the headliner first. Apply the cleaner to a microfibre cloth rather than directly spraying your ceiling to control moisture levels. Never saturate the fabric since a damp cloth provides all the moisture you need.
Gently dab at the stain with the cloth using light pressure, working from the outside of the stain inward to prevent spreading. For stubborn stains, lightly moisten a soft-bristled brush with your cleaning solution and use small circular motions to work the cleaner into the fabric.
The key word here is "lightly"---too much pressure can damage the headliner or push the stain deeper into the material. After brushing, immediately blot the area with a clean, dry microfibre cloth to absorb the loosened dirt and excess moisture.
Continue this process of gentle agitation followed by blotting until the stain disappears. Once you've removed the stain, dry the area completely using a fresh, dry microfibre cloth to press against the cleaned area, absorbing any remaining moisture.
Best Homemade Cleaners for Car Ceilings
When commercial cleaners aren't available, several effective homemade solutions can tackle headliner stains without damaging the delicate fabric. A mixture of one part white vinegar to four parts water works well on most light stains while naturally eliminating odours.
For a slightly stronger solution, mix one tablespoon of mild dish soap with two cups of warm water, creating a gentle detergent that breaks down oils without harsh chemicals. Club soda serves as another option for fresh stains. Its mild carbonation helps lift dirt from fibres while the low sodium content minimises residue.
For protein-based stains like food or beverage spills, mix one part enzyme-based laundry detergent with five parts water for a solution that breaks down these stubborn marks. Always remember to use these homemade cleaners sparingly and never saturate your headliner.
Method 2: Deep Cleaning for Stubborn Stains
When spot cleaning doesn't work and your car's interior roof needs more intensive treatment, deep cleaning becomes necessary. This approach works well for widespread soiling, stubborn stains that resist spot treatment, or situations where your ceiling has accumulated dirt over months or years.
The key difference between spot cleaning and deep cleaning is the comprehensive approach. Instead of targeting individual stains, you'll treat the entire headliner or large sections of it. This method uses slightly more moisture and cleaning power but requires meticulous attention to prevent oversaturation.

Deep cleaning addresses widespread soiling across larger sections of the headliner for comprehensive restoration.
Supplies You'll Need
- Upholstery cleaner or foam cleaner specifically for automotive use
- Multiple clean microfibre cloths
- Soft-bristled brush or detailing brush
- Spray bottle with clean water
- Small portable fan
- Vacuum with upholstery attachment
- Clean towels
- Rubber gloves to protect hands
5 Steps to Deep Clean Your Car Headliner
Step 1: Thorough Vacuuming
Start by thoroughly vacuuming your entire headliner using a brush attachment on low suction. This removes surface dirt and prevents it from becoming mud when you introduce moisture. Work in methodical sections, overlapping your strokes to ensure complete coverage.
Step 2: Apply Cleaning Solution
Apply your cleaning solution to a microfibre cloth or soft-bristled brush—never directly to the headliner. Work in small sections of approximately 2x2 feet, using gentle circular motions to work the cleaner into the fabric. Maintain even pressure and avoid scrubbing aggressively.
Step 3: Remove Soap Residue
Prepare a damp (not wet) cloth with clean water and lightly wipe each cleaned section to remove any soap residue. Soap left behind can attract more dirt over time, so this rinsing step proves crucial for long-term results.
Step 4: Dry Completely
Position a portable fan to circulate air throughout the vehicle with all doors open. The headliner should feel dry to the touch before driving the vehicle to prevent humidity buildup inside. This drying process usually takes 2–4 hours.
Step 5: Final Vacuum
Once completely dry, vacuum the headliner one more time on low suction to remove any loosened particles and fluff up the fabric. This final touch restores texture to the headliner and helps it look freshly installed.
Removing Tough Stains Like Grease & Oil
Grease and oil stains require special treatment as they can penetrate deeply into headliner fabric and resist water-based cleaners. For these stubborn marks, apply a small amount of automotive-grade degreaser or rubbing alcohol to a clean microfibre cloth, never directly to the stain.
Gently press (don't rub) the cloth against the stain, allowing the degreaser to break down the oils. After a brief dwell time of about 30 seconds, blot with a separate clean, dry cloth to lift the dissolved oils.
Tackling Cigarette Smoke & Nicotine Buildup

Nicotine buildup requires multiple treatments with vinegar solutions to break down the sticky residue and eliminate embedded odours. (Image courtesy of CapitalOne)
Cigarette smoke is one of the most challenging cleaning scenarios for car headliners because nicotine penetrates deep into the fabric and creates a sticky residue that attracts more dirt. An effective solution combines equal parts white vinegar and warm water with a few drops of dish soap.
Apply this mixture to a microfibre cloth and work in small sections, using gentle circular motions. The vinegar cuts through the nicotine while neutralising odours embedded in the fabric. For severe smoke damage, you may need to repeat the process several times, allowing the headliner to dry completely between treatments.
Method 3: Steam Cleaning for Professional Results
Steam cleaning represents the most effective method for thoroughly revitalising a heavily soiled car headliner without using harsh chemicals. This technique harnesses the power of hot vapour to penetrate fabric fibres, dissolve stubborn contaminants, and kill bacteria and mould spores.
The key advantage of steam cleaning is that it requires minimal moisture while providing maximum cleaning power. The steam evaporates quickly, reducing the risk of saturating your headliner. The heat helps break down oily residues and loosen embedded dirt, while the pressure helps extract it from the fibres.
Supplies You'll Need
- Handheld steam cleaner (with upholstery attachment)
- Several clean microfibre towels
- Vacuum with brush attachment
- Small portable fan
- Upholstery brush with soft bristles
- Clean spray bottle with water
- Old towels to protect seats and floor
Step-by-Step Steam Cleaning Process
Begin by thoroughly vacuuming the entire headliner to remove loose dirt and debris. Pay special attention to the edges and corners where dirt tends to accumulate. Make sure your vacuum is set to low suction to avoid pulling at the headliner material.
Prepare your work area by placing old towels over your seats and floor to catch any drips. Fill your steam cleaner according to manufacturer instructions, usually with distilled water to prevent mineral buildup. Allow the steamer to fully heat up—most units take 5–10 minutes to reach optimal temperature.

Proper steam cleaning technique requires constant movement and immediate moisture absorption to prevent fabric damage. (Image courtesy of Dupray)
The key technique for steam cleaning your headliner involves working in small sections of about one square foot, keeping the steamer moving constantly. Hold the steamer 6–8 inches away from the headliner fabric to prevent oversaturation, and never keep it focused on one spot for more than a second or two.
Immediately follow behind the steamer with a clean microfibre cloth, applying gentle pressure to absorb loosened dirt and excess moisture. This immediate drying step prevents water spots and headliner damage.
Rental Options vs. Professional Services
When deciding between renting a steam cleaner and hiring professional services, consider both your budget and the condition of your headliner. Most home improvement stores offer steam cleaner rentals for £30–£60 per day, making this an economical option for DIY enthusiasts.
Professional detailing services charge £150–£300 for a full interior detail including headliner cleaning, depending on your location and vehicle size. While more expensive, professionals bring specialised equipment and expertise that can tackle challenging stains without damaging your headliner.
Start with Proper Preparation Tools
Cleaning your car's headliner successfully starts with proper preparation, and that means removing loose dirt before it becomes embedded in the fabric.

While cleaning solutions and techniques matter, the foundation of any good headliner cleaning job begins with thorough vacuuming.
Ordiniq's Handheld Wired Car Vacuum provides the ideal tool for this crucial first step. The adjustable suction control lets you safely remove surface dirt without pulling at the delicate headliner fabric or stressing the adhesive underneath.
The comprehensive attachment set includes specialised tools for different surfaces and debris types. The crevice tool reaches tight spaces around handles and trim, while the brush attachment safely agitates embedded dirt without damaging fabric fibres. This versatility makes our vacuum the perfect companion for any headliner cleaning project.
What sets our vacuum apart is the consistent power delivery throughout your cleaning session. While cordless models gradually lose suction as batteries drain, our wired design maintains full power from start to finish.
The compact size makes it easy to maneuver around your car's interior, and the multiple attachments handle everything from gentle dusting to deep cleaning preparation.
Over 10,000 UK drivers have discovered how proper preparation with quality tools makes the difference between mediocre results and professional-level cleaning. When you start with clean, debris-free surfaces, your cleaning solutions work more effectively and your results last longer.
| Ready to tackle your car's headliner with confidence? Get Your Handheld Wired Car Vacuum today! |
Frequently Asked Questions (FAQ)
Can I use regular household cleaners on my car's ceiling?
Most household cleaners prove too harsh for automotive headliners and can damage the delicate fabric or dissolve the adhesive holding it to the foam backing.
All-purpose cleaners, window cleaners, and kitchen degreasers contain solvents or strong detergents that may cause discolouration or adhesive failure.
Instead, use cleaners specifically formulated for automotive upholstery or gentle alternatives like diluted dish soap or a 50/50 mixture of white vinegar and water.
How do I clean my car roof without leaving water marks?
Avoiding water marks requires controlling moisture and proper drying techniques. Never apply cleaning solutions directly to the headliner. Instead, lightly dampen a microfibre cloth with your cleaner and use gentle dabbing motions.
Work in small sections, immediately following with a clean, dry microfibre cloth to absorb moisture. Ensure proper ventilation during cleaning and allow 2–4 hours of drying time with good airflow.
Will cleaning my car's headliner cause it to sag?
Sagging occurs when excessive moisture weakens the adhesive bond between the fabric and foam backing.
When proper techniques are used (e.g., controlling moisture, working in small sections, and ensuring thorough drying), you can clean your headliner without causing sagging. The highest risk comes from oversaturating the material or applying heat to speed drying.
How do I remove pen or crayon marks from my car's ceiling?
For ballpoint pen ink, apply a small amount of rubbing alcohol to a cotton swab and gently dab the mark until it begins transferring to your cloth.
For crayon marks, place a paper towel over the stain and gently press with a warm iron on low setting - the heat melts the wax, which the paper towel absorbs.
Why should I use Ordiniq’s Handheld Wired Car Vacuum for headliner maintenance?
Ordiniq's Handheld Wired Car Vacuum provides the perfect solution for regular headliner maintenance. The variable suction control lets you safely remove loose dirt and debris without damaging delicate fabric, while the specialised brush attachment reaches every corner and crevice.
Unlike cordless models that lose suction as batteries drain, our wired vacuum maintains consistent power throughout your cleaning session. The compact design makes it easy to maneuver around your car's interior, and the multiple attachments handle everything from gentle dusting to deep cleaning preparation.


