


Key Takeaways
- Quick action within 5–10 minutes of a coffee spill drastically increases your chances of complete stain removal from leather seats.
- Using the wrong cleaning products on leather can cause permanent damage, so always opt for pH-balanced leather cleaners.
- Leather needs conditioning after cleaning to restore moisture and prevent cracking or discolouration.
- Blotting (never rubbing) is crucial when dealing with fresh coffee spills on leather upholstery.
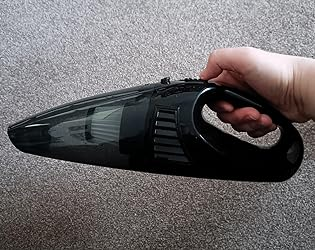
- Ordiniq's Handheld Cordless Car Vacuum Cleaner (£49.99) provides powerful suction for quick cleanup of coffee grounds and debris, helping prevent grinding particles into leather during spills.
Quick Action: Why You Need to Clean Coffee Spills Immediately
Coffee spills happen in an instant but can leave lasting damage on your beautiful leather car seats. The acidic nature of coffee means it starts working against your leather immediately, potentially causing discolouration and even breaking down the protective coating. When coffee penetrates deep into the leather's pores, what could have been a simple cleanup becomes a challenging restoration project.
Time is your greatest ally when dealing with coffee spills on leather. Within the first few minutes, coffee remains mostly on the surface where it's much easier to remove. After about 10–15 minutes, it begins to penetrate deeper into the leather's porous structure. Once it reaches the lower layers of the leather, the tannins in coffee can cause permanent staining that even professional cleaners may struggle to remove completely.
|
Ordiniq Handheld Car Vacuum: Drive Clean, Drive Fresh Join 10,000+ Drivers Who Keep Their Cars Spotless Why Ordiniq’s Vacuum Is Essential
What Customers Say ★★★★★"I keep this light weight vacuum cleaner in our car and handy to clean the mess created by little one. The size is small but powerful enough to clean the car seat. It also has accessories to allow to clean the small gap and corner. Definitely will buy another piece for another car. Good value too." - Connie Try It Risk-Free for 30 Days Experience spotless car interiors with zero worries. If it doesn't transform your daily commute within 30 days, we'll refund your purchase—no questions asked. FREE BONUSES: 1-Year Extended Warranty + FREE Shipping Get Ordiniq's Handheld Wired Car Vacuum Cleaner Today! *Ordiniq also offers AutoPump and a Tyre Repair Kit —great extras to keep in your boot for added peace of mind. |
What You'll Need to Clean Coffee from Leather

Having the right tools on hand before an accident happens can make the difference between a simple cleanup and a costly repair. The goal is to remove the coffee without harming the leather's natural protective coating or causing discolouration.
Essential Cleaning Supplies
Creating your leather care kit doesn't require expensive specialty products, but it does demand the right ones. Clean microfibre towels are non-negotiable as they won't scratch or leave lint behind on your leather.
You'll need at least two, one for cleaning and one for drying. A high-quality leather cleaner with a neutral pH balance (around 7.0) ensures you're removing the coffee without stripping away the leather's natural oils or protective coating. Distilled water is preferred over tap water as it doesn't contain minerals that might leave residue. Finally, a genuine leather conditioner restores essential moisture after cleaning.
Optional Products for Tough Stains
For stubborn coffee stains that have had time to set, you might need to bring in reinforcements. We recommend having specialised leather stain removers in your arsenal for these challenging situations. These products are specifically formulated to tackle difficult stains while remaining gentle on leather surfaces.
For particularly stubborn stains, an enzymatic cleaner can break down the proteins in coffee without damaging the leather, though these should always be tested in an inconspicuous area first.
Step-by-Step Coffee Stain Removal Process
1. Blot the Excess Coffee
The moment coffee spills, grab a clean, dry microfibre cloth and begin blotting, never rubbing, the affected area. Rubbing pushes the coffee deeper into the leather's pores, making the stain more difficult to remove. Work from the outside edges towards the centre to prevent spreading the stain.
Continue blotting until no more liquid transfers to your cloth. For larger spills, you may need multiple cloths as a saturated cloth will just redistribute the coffee rather than absorb it.
2. Create a Gentle Cleaning Solution

For fresh coffee spills on leather, a gentle cleaning solution is your best bet.
Mix a few drops of pH-balanced leather cleaner with distilled water in a small spray bottle. The solution should be diluted enough not to saturate the leather but concentrated enough to break down the coffee residue.
If you don't have a dedicated leather cleaner on hand, a temporary alternative is a solution of 5 parts distilled water to 1 part mild, colourless dish soap, though this isn't ideal for regular use on leather. Avoid household cleaners like ammonia, bleach, or vinegar, as these can permanently damage leather by breaking down its protective coating and natural oils.
3. Test in an Inconspicuous Area
Before applying any cleaning solution to the visible stained area, always conduct a patch test in a hidden spot. The underside of the seat or a portion that's tucked against the centre console works well. Apply a small amount of your cleaning solution and gently dab with a clean microfibre cloth.
Wait 5 minutes to ensure no discolouration, darkening, or texture changes occur. This crucial step can prevent turning a simple coffee stain into permanent damage across a larger area of your seat.
4. Clean the Stained Area
Once your solution passes the patch test, lightly spray or apply it to a clean microfibre cloth, never directly onto the leather, and gently work it into the stained area using small circular motions. Start from the outer edges of the stain and move inward to prevent spreading.
For textured leather, you may need a soft-bristled brush to work the cleaner into the grain, but use extremely light pressure to avoid scratching. Be patient with this process; it's better to make several gentle passes than to scrub aggressively and damage the leather.
5. Rinse with a Damp Cloth
After the coffee stain appears to be removed, rinse away all cleaning solution residue. Dampen a fresh microfibre cloth with distilled water, wring it until it's just slightly damp, and gently wipe the area. Any soap or cleaner left behind can attract dirt and cause premature wear on your leather.
Pay special attention to the edges of the area you've cleaned to ensure no residue remains. Even pH-balanced cleaners can eventually dry out leather if left on the surface, so this rinsing step is not optional. For larger cleaned areas, you may need to rinse your cloth and repeat several times to ensure all cleaning solution is removed.
6. Dry the Leather Properly
Proper drying prevents water spots and potential mildew issues. Use a clean, dry microfibre cloth to gently pat the cleaned area until no moisture remains.
Never use heat sources like hair dryers, heat guns, or leaving your car in direct sunlight with windows closed to speed up drying, as this can cause the leather to shrink, crack, or become brittle. If possible, leave car windows cracked slightly to promote air circulation while the leather dries naturally.
Conditioning After Cleaning: A Crucial Step
Why Conditioning Matters
Leather is a natural material that requires ongoing maintenance to retain its supple texture and resistance to staining. Each time you clean leather, especially when removing something as acidic as coffee, you strip away some of its natural protective oils.
Conditioners replenish these oils while adding a protective barrier against future spills. Regular conditioning also prevents premature aging signs like cracking and fading, particularly important in vehicle interiors that face extreme temperature variations and UV exposure. Quality leather conditioners contain UV inhibitors that protect against sun damage and moisturisers that keep leather fibres flexible.
How to Apply Leather Conditioner
Apply a small amount of leather conditioner to a clean microfibre cloth, never directly onto the seat, and work it into the leather using gentle circular motions. Less is more with conditioner; start with a small amount and add more if needed.
Cover not just the cleaned area but the entire panel or section to ensure even absorption and colour matching. Allow the conditioner to penetrate for the time recommended on the product label (typically 10–30 minutes) before buffing away any excess with a dry microfibre cloth.
For optimal leather protection, condition your seats every 2–3 months under normal use, more frequently in extreme climates or for vehicles regularly parked outside.
Keep Your Leather Pristine with Ordiniq
Prevention remains your strongest strategy against coffee damage. At Ordiniq, we understand that maintaining spotless leather interiors requires more than just stain removal, it demands the right equipment for comprehensive care.
Our Handheld Cordless Car Vacuum Cleaner delivers professional-grade suction power in a compact, portable design that makes quick work of coffee grounds, crumbs, and debris before they damage your precious leather upholstery.

Ordiniq Handheld Car Vacuum Cleaner is perfect for busy car owners seeking convenience and hygiene on the move.
Priced at just £49.99 with free delivery, multiple attachments, and a 30-day money-back guarantee, our vacuum cleaner complements your leather care routine perfectly. The powerful suction effortlessly removes particles that could scratch leather surfaces during cleaning, whilst the cordless design provides freedom to reach every corner of your interior.
| Visit Ordiniq today to discover how our Handheld Car Vacuum transforms routine maintenance into effortless excellence, keeping your leather seats immaculate between deep cleaning sessions. |
Frequently Asked Questions
Can I speed up the drying process with a hairdryer?
No, never use heat sources like hairdryers, heat guns, or direct sunlight to dry leather after cleaning. Heat causes leather to shrink, crack, and become brittle. Instead, allow natural air drying for 2–4 hours, or use a fan positioned to circulate air around the area for faster evaporation.
What's the difference between cleaning and conditioning leather?
Cleaning removes dirt, stains, and contaminants from leather surfaces, whilst conditioning replenishes essential oils and moisture lost during cleaning. Both steps are necessary—cleaning alone strips protective oils, leaving leather vulnerable to cracking. Always condition within 24 hours of cleaning to maintain leather's suppleness and protective barrier.
Will the cleaning process damage my perforated leather seats?
Perforated leather requires extra care as liquid can seep through holes into the foam beneath. Use minimal moisture, apply cleaner to your cloth rather than the seat, and work gently around perforations. Avoid saturating the area, and consider professional cleaning for heavily soiled perforated leather to prevent internal damage.
Why should I choose Ordiniq's Handheld Car Vacuum for maintenance?
Ordiniq's Handheld Cordless Car Vacuum Cleaner (£49.99) offers powerful suction in a compact design, perfect for quickly removing coffee grounds and debris before they damage leather. With multiple attachments, cordless convenience, and a 30-day money-back guarantee, it's the ideal preventative tool alongside your leather cleaning kit for comprehensive interior care.
*Note: Pricing and/or product availability mentioned in this post are subject to change. Please check the retailer's website for current pricing and stock information before making a purchase.


